discussion of head button squish angle

Intlwaters

Help Support Intlwaters:

This site may earn a commission from merchant affiliate links, including eBay, Amazon, and others.

Michael Costanzo

Well-Known Member
Joined
Jan 7, 2009
Messages
1,953
OK,first off NOT A PISSING MATCH! everyone has there own opinion and many ways to skin a cat.

i would like to know what the effect of having a flat squish band VS a tapered squish band one. i have a head that has way to much piston to head clearance and have to mill it down which will also lower my vol#'s which is what i am looking for. thanks,mike.
 
Mike if the clearance is to much you just cut the part that sits on the liner. This will not change the cc at all.
 
Mike if the clearance is to much you just cut the part that sits on the liner. This will not change the cc at all.
dave,looking at the EAP's,head needs to be 0.10 smaller to get comp ratio i want.also this head has a recess between the combustion area and the rest of the head.
 
flat is a good slam,but if u dont want an engine thats a switch 1/2degree will make it easier to tune....if ur into less performance for ease of tuning.my 2¢
 
Thoughts on the subject from the developer of the Aprilia 125, Jan Thiel:

I discovered that making the underside of the transfer ports even with the piston in BDC
was very important: considerably more power, less detonation and far better piston cooling.
We started to have the exhaust ducts CNC machined in 1999 I think.
But first we had to overcome the new fuel regulations in 1998
102 octane had to be used instead of 130 octane.
We expected BIG problems.....
But within a couple of month's we had more power than before!
The compression ratio was lowered from 19,5:1 to 16:1
And the tailpipe restrictor was made 0,25mm bigger.
Then a very serious combustion chamber development was started.
The result was that parallel squish was the best, with a squish height of 0,75mm
Less squish height would give more torque but less revs.
At 0,45 the piston touched the head....
Then a head insert with a much wider squish band (50% of cylinder surface) was tried.
And that proved to be the final touch.
We now had more power than with the 130 octane fuels, and less problems.
The sharp edge between combustion chamber and squish band proved to be very important.
Even a small radius would give 0,5HP less..

Lohring Miller
 
Thoughts on the subject from the developer of the Aprilia 125, Jan Thiel:

I discovered that making the underside of the transfer ports even with the piston in BDC

was very important: considerably more power, less detonation and far better piston cooling.

We started to have the exhaust ducts CNC machined in 1999 I think.

But first we had to overcome the new fuel regulations in 1998

102 octane had to be used instead of 130 octane.

We expected BIG problems.....

But within a couple of month's we had more power than before!

The compression ratio was lowered from 19,5:1 to 16:1

And the tailpipe restrictor was made 0,25mm bigger.

Then a very serious combustion chamber development was started.

The result was that parallel squish was the best, with a squish height of 0,75mm

Less squish height would give more torque but less revs.

At 0,45 the piston touched the head....

Then a head insert with a much wider squish band (50% of cylinder surface) was tried.

And that proved to be the final touch.

We now had more power than with the 130 octane fuels, and less problems.

The sharp edge between combustion chamber and squish band proved to be very important.

Even a small radius would give 0,5HP less..

Lohring Miller

That's kinda where I went after doing much reading with my 67 SAW effort, but closer to 65-70% squish area. Flat squish band (think that's what he means by "parallel" ie: matching the piston), and a sharp squish to bowl corner (thanks Jim).

You can run some crazy C/R when the motor is only at WOT for a few seconds at a time.

Think I see a dyno in my future...
default_smile.png
 
Last edited by a moderator:
Thoughts on the subject from the developer of the Aprilia 125, Jan Thiel:

I discovered that making the underside of the transfer ports even with the piston in BDC

was very important: considerably more power, less detonation and far better piston cooling.

We started to have the exhaust ducts CNC machined in 1999 I think.

But first we had to overcome the new fuel regulations in 1998

102 octane had to be used instead of 130 octane.

We expected BIG problems.....

But within a couple of month's we had more power than before!

The compression ratio was lowered from 19,5:1 to 16:1

And the tailpipe restrictor was made 0,25mm bigger.

Then a very serious combustion chamber development was started.

The result was that parallel squish was the best, with a squish height of 0,75mm

Less squish height would give more torque but less revs.

At 0,45 the piston touched the head....

Then a head insert with a much wider squish band (50% of cylinder surface) was tried.

And that proved to be the final touch.

We now had more power than with the 130 octane fuels, and less problems.

The sharp edge between combustion chamber and squish band proved to be very important.

Even a small radius would give 0,5HP less..

Lohring Miller

That's kinda where I went after doing much reading with my 67 SAW effort, but closer to 65-70% squish area. Flat squish band (think that's what he means by "parallel" ie: matching the piston), and a sharp squish to bowl corner (thanks Jim).

You can run some crazy C/R when the motor is only at WOT for a few seconds at a time.

Think I see a dyno in my future...
default_smile.png
OK,since i am not a machinist or engineer (truck driver,race car mechanic,welder) please explain when you say 65% squish are we talking about starting from the inside of the combustion chamber and head to the outside of the head? also has sharp are the radius? do you set the cc's first and then the squish or visa versa? thanks,mike.
 
Calculate the area of the complete bore (pi x 1/2 bore squared) and subtract the area of the bowl to get the squish area. Divide the squish area into the total area to get the ratio. You can work the numbers backwards or just mess around until you figure out how wide to make the band to get a certain ratio (%).

You can use an online calculator to get the volume of the button:

http://keisan.casio.com/has10/SpecExec.cgi?id=system/2006/1223382199

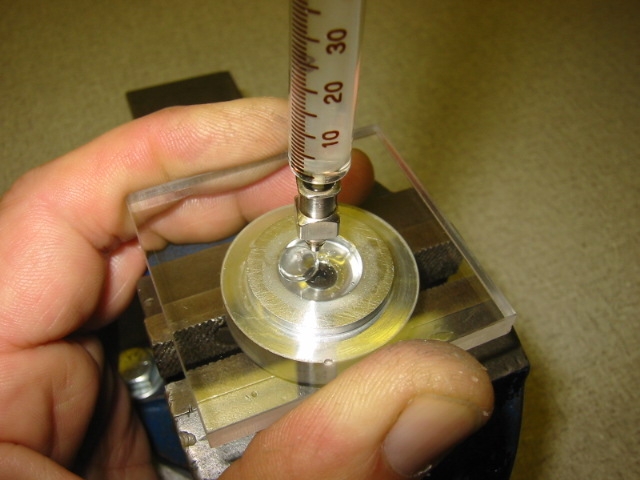
To check it all you should have a syringe and some sort of plate, I used to get them at the drug store but got tired of the questions so I got a glass insulin needle off FleeBay. The plate is plexiglass with two small holes drilled in it.

Don't forget to include the volume of the squish and any dish in the piston.
default_happy.png


ScanImage006.jpg


The corner between the bowl and squish band should be sharp, not rounded or blended in.
 
Last edited by a moderator:
Mike do you have the squash velocity calculator in your EAP? you should if it is the new one. It will tell you in that spread sheet what the squash % is.

2.5 to 3 deg angle works good for the squash band I have found. no flat section.
 
Last edited by a moderator:
terry,i have a piece of lexan and needle set up .that is how i do the cc's.thank you for the formula.

dave,i will look to see if the squish calculator is on my eap. and 10-4 on the angle,thanks,mike.
 
Calculate the area of the complete bore (pi x 1/2 bore squared) and subtract the area of the bowl to get the squish area. Divide the squish area into the total area to get the ratio. You can work the numbers backwards or just mess around until you figure out how wide to make the band to get a certain ratio (%).

You can use an online calculator to get the volume of the button:

http://keisan.casio.com/has10/SpecExec.cgi?id=system/2006/1223382199

To check it all you should have a syringe and some sort of plate, I used to get them at the drug store but got tired of the questions so I got a glass insulin needle off FleeBay. The plate is plexiglass with two small holes drilled in it.

Don't forget to include the volume of the squish and any dish in the piston.
default_happy.png


ScanImage006.jpg


The corner between the bowl and squish band should be sharp, not rounded or blended in.
terry,are you getting the bowl cc's first and then doing the squish? and when you do the squish are you working from the outside in or visa versa with the cutting tool?
 
Thoughts on the subject from the developer of the Aprilia 125, Jan Thiel:

Then a very serious combustion chamber development was started.

The result was that parallel squish was the best, with a squish height of 0,75mm

Less squish height would give more torque but less revs.

At 0,45 the piston touched the head....
I'm struggling a bit with this. If parallel means that the squish band was parallel with the piston, I don't understand why the piston would have touched the head at 0.45mm (0.45mm = ~18 thou). Unless parallel means square to the bore, and the piston was domed ?
 
At RPM the clearance in the eng and the rod stretch combined will let the piston hit the head. Metal will expand when heated up and it will also stretch under load. Remember that rod is trying to stop the piston and send it in the opposite direction at high speed.
 
Some thing to remember with a domed piston if the squash band is parallel to the piston . The entry angle of the squash is angled in to the chamber.

So with a flat top piston a angled squash will also have a angled entry into the chamber.

With that said do you think the entry angle of the gasses into the chamber make a difference?
 
You have to remember, Mr. Thiel is talking about a single cyld. 125cc. motor with a bore size of 54mm. A head clearance of .45mm is not a lot, considering the piston doesn't stay 100% square in the bore at TDC. As the piston roles over TDC, combustion rocks it over slightly to thrust on the intake side skirt. I would suspect that any head contact ( at that clearance ) would be from that, and component stretch combined.
 
Back
Top